Merciful God, You are great in compassion and Your tenderness for us is without measure. We ask You to give us today our daily bread, and also provide for the needs of all of Your hungry children around the world. Through Christ Your Son and Our Lord. Amen.

Showing posts with label Budget. Show all posts

Tuesday, October 8, 2013

Pierogies with Bacon and Peas


I realize this recipe is not for everyone (including members of my own family), but it's a comfort dish to me, and maybe will be for you. It's easy -- you can whip it up in less than 25 minutes, and it's good rib-sticking food for autumn and winter. Because the menfolk in my family will not eat it, ahem, I save this dish for a night when just Faith and I are home and we both love it.

The recipe came from Cooking Light (though I doubt the "lightness" of it), and I make it almost the way it's written -- a little less bacon and onion and regular sour cream instead of low-fat. I am posting it the way I make it. Be sure to slice the onion like an apple so that the pieces are big enough for picky onion eaters to remove them.

This is a great dish to serve for the feast of St. Faustina, Blessed John Paul II, St. Maximilian Kolbe, St. Teresa Benedicta (martyred in Poland) or any of the Polish saints, as pierogies are a traditional Polish dish.


Pierogies with Bacon and Peas


12 frozen potato and onion pierogies (such as Mrs. T's)
4-6 slices center-cut bacon
1 onion, peeled and sliced vertically
1 t. sugar
1/4 t. dried thyme
1 cup frozen green peas
salt and pepper to taste
1/4 cup sour cream


Place frozen pierogies in a bowl of tepid water, high enough to cover them.

Cook bacon in a large nonstick skillet until crisp. Remove bacon; crumble. Increase heat to medium-high. Add onion, sugar, and thyme to drippings in pan; sauté 5 minutes. Stir in peas; sauté 1 minute. Drain pierogies and add them to the skillet, Salt, and pepper; cook 30 seconds. Sprinkle with crumbled bacon. Taste for seasoning and adjust if necessary.

Serve with sour cream.


I suggest serving with warm applesauce, or a green salad, and soft rolls.


Source: modified from Cooking Light


Wednesday, September 25, 2013

Potato Eggs


If you read my menus, you know we eat breakfast for dinner quite a bit. I don't cook a big breakfast, except on Sunday, and breakfast food is so good (and inexpensive), my husband and kids like eating it more often than once a week.

This recipe intrigued me, just by looks alone. Potatoes and eggs go great together, but an egg cooked in a potato? Really intriguing. Essentially it is similar to a twice-baked potato, but with a hole created in the filling where an egg is cracked and baked. The recipe called for sausage, but I omitted it to make a meatless meal. It would be delicious with sausage, but also with ham or bacon, for a Sunday brunch. I am listing the recipe as I made it below, but if you have ever made twice-baked potatoes, you know you really don't need a recipe. Bake the potatoes, cut off the top, scoop out much of the potato leaving a thin shell, mash potatoes with butter, parmesan cheese, sour cream or cream cheese, or a little milk and some shredded cheddar or swiss. The combinations are endless -- adding meat or not -- just keep the potato mixture rather firm so that it holds the well needed to crack the egg into.

I cooked for four of us, but essentially use one potato, one tablespoon butter, 2 tablespoons shredded cheese and even two tablespoons of chopped meat (diced ham, cooked sausage or bacon), plus one egg for each person.

Serve with toast or biscuits, and some fresh fruit.


Potato Eggs

4 baking potatoes, scrubbed, pierced, and rubbed lightly with oil
1/4 c. butter, softened
salt and pepper
1/2 c. Parmesan cheese
4 eggs

Heat oven to 400 degrees F. 

Bake potatoes for 45 minutes to 1 hour, until done.

Remove from oven and cool for about 15 minutes.

Cut off the top of potato, creating a "boat." Scoop potato out of potato and place in a bowl. Repeat with each potato. Add butter and mash potato with a masher until no longer lumpy. Salt and pepper mixture and then add cheese (or other optional ingredients). Stir until well mixed. Spoon potato mixture back into potatoes, dividing among them. Place potatoes in a baking dish, lined with foil, or greased lightly. Make a well in each potato, and crack and egg into each well (depending on size of egg it may overflow slightly -- that's alright).

Place baking pan back in 400 degree oven and cook for 10-15 minutes, depending on desired doneness. Salt and pepper to taste.


Thursday, June 13, 2013

An Italian Feast Day meal


I had a heart-to-heart with myself recently. I had to decide whether or not I was going to keep using this space, because  I was still taking photos of food and making mental notes about recipes, but after a day my mental notes were gone, and sometimes I even lost track of the recipe. Not very organized, I know. But every meal I made would result in the same internal battle about whether or not I want to continue writing in this space.

Ultimately, I decided to keep it up. I love cooking, and I love integrating food into the liturgical year, so that is what I hope to continue doing.

Today is the feast of St. Anthony of Padua. I tend to tie my meals together with the feast day with ethnic food, because it's easy and it's fun. I have to make dinner anyway, so I'm really not adding anything extra to my workload.

Today's saint, St. Anthony of Padua, is one of my favorite saints. My oldest son chose him as his patron, and he is one of the saints I call on most often --"Tony, Tony come around..." That poor man never has a moment's peace. Padua is in Italy and so tonight's feast was Italian. You could use this menu for any Italian saint, however, and there are many.

The pasta dish was one I had pinned a couple months ago to "test drive" for my second son who will be living alone next year. It was so simple and delicious -- clean plates all around.

The vegetable is a seasonal sort of treat. My friend Katie (my egg lady) sent some zucchini and garlic scapes along with my eggs this week. I had never cooked garlic scapes, but they were very tasty, and I'll definitely try them again.

With a loaf of ciabatta garlic bread (purchased), the meal was complete, and so easy.


Skillet Baked Ziti

1 T. olive oil
1 T. minced garlic
1 t. dried red chili flakes
 28 oz can crushed tomatoes
3 T. dried basil
1 1/2 cups chicken broth
3 cups uncooked penne or ziti
1/2 cup grated Parmesan cheese
1 cup shredded mozzarella
1-2 T. sliced fresh basil leaves

Preheat oven to 400 degrees. 

In a 12-inch skillet, heat olive oil over medium high heat.
Add garlic and red chili flakes and cook until fragrant, about 30 seconds. 

Add tomatoes and a pinch of salt; reduce heat to maintain a gentle simmer. Cook for 10 minutes, or until tomatoes break down a bit.

Add the broth and dried basil and return to a simmer. Add pasta and cover; cook according to package directions for just firm (12-15 minutes).

Remove lid, season with salt and pepper, and stir in Parmesan. Sprinkle mozzarella over top of pasta.
Bake at 400 degrees until cheese is melted and bubbly, about 8-10 minutes.

Sprinkle with basil and serve hot.

(If you are using a pan that has a plastic handle, cover handle with foil before placing it in the oven)

Source: modified from Serious Eats via College East 101


Zucchini and Garlic Scapes

1 T. coconut oil or unsalted butter
2 medium zucchini washed and sliced about 1/4 inch thick
6 garlic scapes, rinsed and cut in half or three pieces
salt

Heat oil or butter in large skillet over medium high until hot.
Add zucchini and scapes and cook for about 20 minutes, flipping zucchini to brown both sides.
Season with salt and serve hot.


Wednesday, March 6, 2013

Slow Cooker Cheesy Chicken and Rice


Well, look, there is a real person at this blog. And today there is a real recipe. Three cheers, eh?

I've been pinning many recipes, but trying few. Mostly I've been eating from the freezer (meals made times three, and two frozen) or just preparing dishes that are on the regular rotation (favorite meals).

This meal is certainly not fancy, but on a very cold night, with a winter storm on the way, it was comforting, and having put it in the crockpot on high at 1 p.m., and then having left the house for appointments, it was a welcome sight when I arrived home hours later. It smelled awfully good, too.

Essentially you only put the chicken, onions and cream of chicken soup in the crockpot. The corn, rice and cheese you add just before serving. I was a little surprised when I read the recipe, because I assumed that it was a dump-everything-in-and-cook recipe. I used my rice cooker (one of my favorite small kitchen appliances) to cook the rice and add it just before serving.

The original poster (Christy Jordan's Southern Plate) used Zatarain's yellow rice, but my family favorite is Goya. Having spent many of my formative years (those teenage ones, if truth be known) in Tampa, Florida, I ate a lot of Cuban yellow rice with chicken. Yellow Rice with Chicken (green peas mixed in -- it's traditional) was available in the cafeteria at school every day, and we really learned to love it (the white kids -- the Cuban kids already loved it), and many restaurants served it as well. It was just a regional standby. I think the Goya yellow rice tastes more authentic, but use what you like.

I also subbed out my own cream of chicken soup (found at the bottom of this recipe post). It only takes a minute to make, really, and it tastes better. Use a good quality chicken soup base or bouillon cube that doesn't include MSG.

I'll tell you, my husband looked at this dish in the bowl and did not make a happy face. He does not generally like chicken and rice dishes. But he took a bite and said, "Mmmmm." And then another "mmmmmmm." And he cleaned his plate like a good boy. The kids liked it, too, except an onion hater who could still see onion pieces with a microscope.

I think you could definitely substitute another vegetable for corn in this dish. I would use cooked carrot coins (or just add the carrots earlier in the process) or frozen peas (I would love that but no one else in my house would except Faith). Both would probably be more visually interesting than corn, and more nutritious, but for the first try I stuck with the recipe, except to double it and freeze the leftovers.


Slow Cooker Cheesy Chicken and Rice
serves 10-12 


6-8 boneless skinless chicken breasts (I halve them lengthwise so they cook quicker)
1 large white onion, chopped 
2 -8 ounce box Goya Yellow Rice Mix, cooked according to directions
1 cup cheddar cheese
2 - 10.5 ounce can cream of chicken soup (or two recipes of homemade)
1 bag frozen corn 

Place chicken in bottom of slow cooker. Scatter chopped onion over top. Spoon cream soup over top of that. Cover and cook on low 7-8 hours or on high 3-4 hours. About 30 minutes before serving, break up chicken with two forks and add corn. A few minutes before serving, add in cooked rice, and cheese. Stir to combine. Add hot water if mixture needs thinned. Serve hot.

Serve with a green salad, fruit, bread, or a hot green vegetable.


Wednesday, January 9, 2013

Pot Roast with Red Wine and Mushrooms


Whenever I spy a chuck roast on sale at the grocery, I grab one or two. While chuck is a tough and sometimes fatty cut of meat, it can be used for a tender pot roast, or any variety of tasty stews. Cooked long and low in a tasty broth, chuck roast is one of the most comforting cuts of beef I know. The tough gets all soft and most of the fat cooks down and can be skimmed off to make gravy.

On Sunday, I had a big cut of chuck roast, a lovely bottle of gifted Italian wine and 12 or so ounces of fresh cremini mushrooms. Sounds like pot roast. I have several recipes for pot roast, but none used much wine or mushrooms, so I varied my recipe a tad. You can never have too many chuck roast recipes.

I left the "sauce" loose, choosing to just pour it instead of thickening it for gravy. The buttered polenta soaked it right up. Yum.


Pot Roast with Red Wine and Mushrooms
serves 6-8

3 or so pounds chuck roast
2 T. olive oil
salt and pepper
1 onion (sliced like an apple)
1 1/2 cups good red wine, merlot, cabernet, or a blend (mine was an Italian primitivo, similar to a zinfadel)
1 can vegetable broth
2 t. beef base or bouillon cubes
4 T. or so tomato paste or ready-made tomato sauce
1 T. Dijon mustard
1 T. Italian seasoning (herbes de provence would work, too)
5 cloves garlic, peeled and smashed

8-10 carrots
2 stalks celery, sliced
8-12 ounces cremini mushrooms  sliced or quartered (if you have mushrooms detectives, just quarter them so they can push them aside)


Preheat oven to 325 degrees F.

Heat a large dutch oven over medium high heat. Add oil and heat. Season roast with salt and pepper and place, seasoned side down, in oil. Season other side. Cook until lightly browned, and turn, cooking other side until lightly browned. Turn heat down to medium and add onions. Stir and let cook five minutes or so. Pour the wine and broth over roast. Stir in beef base, tomato paste/sauce, mustard and seasoning. Add garlic cloves. Bring to a simmer. Cover and place in 325 degree oven. 

Cook for two hours until roast is beginning to fall apart.

Add carrots, celery and mushrooms. Cook for 30-45 minutes until vegetables are tender.

Remove meat from sauce. Break up into serving-size pieces. Remove vegetables to a bowl or platter and keep warm with roast. Strain sauce and skim some of the fat off.  Season to taste. Serve in a gravy bowl with ladle.

Serve with mashed potatoes, hot noodles, or a bowl of steaming buttered polenta. Yum.


Thursday, October 4, 2012

German Pancake


aka Dutch baby, Monster pancake, Bismark, Dutch puff


The pancakes puffs way up in the oven,
 but it falls fast when it comes out. 
Don't worry -- it tastes the same both ways.


Today's recipe is one I have seen on about a million (slight exaggeration) food blogs, but never got around to making. Each time I came across it, I would think, "I really should make that" and then I would tuck it away in the back of my mind where it stays rather dark all the time. In other words, I would forget about it. But something nudged me this week (maybe a lack of meat in the freezer from not shopping) and I decided to make it.

I can't believe I've gone 50 years and never enjoyed this wonderful dish. I loved it, my husband loved it, and the kids all loved it. A grand slam!

On Tuesday, when I decided that German Pancake would be dinner (along with some eggs, bacon and sauteed apples) I did some hunting for a recipe, but I never really found one that would feed all of us and have just the right taste I wanted -- not too eggy. Thus, I made up my own recipe using the ratios of egg to milk and flour that I wanted. It was easy to make and puffed up just perfectly in the oven. The family was pretty much awed at the whole thing.

In terms of dressing the pancake, I went with a traditional squeeze of lemon juice and powdered sugar. My husband and I scooped the sauteed apples onto our slices, but the kids went with maple syrup. If you think you might not like the lemon juice, omit it, but it was not a dominant flavor, just so you know.

This will definitely be a regular dish in our German home from now on, and I am so glad I didn't wait another day to make it. (Neither my German mother nor my German mother-in-law had ever had this dish before, so I can't say it is authentically German, but it sure sounds good.)


German Pancake
serves 5-6 (or more if children are eating)

5 eggs
1 2/3 c. milk (I don't recommend skim)
1 2/3 c. flour (all-purpose)
1/4 c. white sugar
3/4 t. salt
1 t. vanilla
5 T. butter
1/2 a lemon
powdered sugar for dusting

Preheat oven to 400 degrees F.

In a large (12") cast iron or oven safe skillet, place butter over medium high heat. Heat until butter is melted, but be careful not to brown it. 

Remove from heat and cool butter.

In a large bowl, beat eggs and milk together with a whisk until very smooth (so you can't see any separate parts of the egg -- all one solid pale yellow). Add flour, sugar, salt and vanilla, and then pour cooled butter in, leaving just a coating on the pan. Stir until batter is smooth, then pour batter back in the pan and immediately place in hot oven.

Bake for 20 minutes. Reduce heat to 350 degrees F and then bake until top is golden brown and very puffy, no more than about 10 minutes.

Remove from oven and immediately squeeze the juice of half a lemon over the top. Sprinkle with powdered sugar. Cut into slices like a pie and serve immediately.


The first half of the rise in the oven.


Monday, June 18, 2012

Lidia's Polenta


During the hot summer months I don't often make a dish that requires a long, slow simmer on the stove. Not only does a long, slow simmer heat up the kitchen, but those heavier meals are often too heavy for hot weather (even when the house is air conditioned). Occasionally, however, a simple meal like polenta and sauce is a nice dish to enjoy on a rainy summer day -- one like this recipe for Lidia's Polenta.

Polenta is a simple dish to prepare, and paired with a really good jarred pasta sauce (or some homemade sauce you stashed in the freezer) and some sauteed Italian sausages, a tasty treat even for a summer evening.

On the evening we ate this meal, I browned some fresh Italian sausages in some olive oil in a large skillet, opened a jar of Tyler Florence's Vodka sauce, poured it over the sausages and simmered them for a half hour or so. Then I sliced the sausages and served them, with the sauce,  over a spoonful of this wonderful polenta, with Parmesan cheese. Simple and delicious (and inexpensive).

I omit the bay leaves when I make it, but other than that, I make it as written.

Lidia's Basic Polenta


2 c. milk
2 c. water
1 T. unsalted butter
1 bay leaf (optional)
2 T. coarse salt (I start with less until I taste it)
1 1/2 c. coarse yellow cornmeal (or polenta if you can find it labeled as such)

In medium saucepan, combine milk, water, butter, bay leaf and salt. Heat to simmer over medium flame. Slowly sift cornmeal into pan through fingers of one hand, stirring constantly until polenta is smooth and thick and pulls away from sides of pan when stirred, about 20 minutes. Discard bay leaf.


Thursday, June 7, 2012

Hot dogs and potatoes


From one day to the next I never know how dinner is going to be received in my house. That can be a frustrating thing. You go to all that work and then the kids stick their noses up at it. Not that they are permitted to be rudely critical, but if they don't eat, then that's a pretty clear criticism.

I can take the criticism, but I hate wasted food. Period.

I also hate to fight over food, so I gave up a long time ago making kids sit at the table until their plate is clean. My sanity is more important than my pride.

Anyway...short story long, the other day I was asked, as I am every day, "What's for dinner?" When I said, "hotdogs and potatoes," I was met with mixed comments. I told them all to "Shut it" and they could eat it or not. They all ate it. It was good, simple, and really easy to make food.

The bottom line is, kids like hotdogs (and I use good beef hotdogs) and fried potatoes (and just dice the onions really small and encourage them to cover it in ketchup -- hey, it has lycopene!). So what's not to like? Serve some fresh fruit on the side, like sliced watermelon, or bing cherries, and some yummy buttermilk biscuits with strawberry jam. It's a good, easy meal. And it's cheap. Yey.


Hotdogs and potatoes

oil for frying (I use canola for this dish)
one large white Idaho potato for each person, peeled, halved lengthwise and sliced across in 1/4 inch pieces.
1 to 2 T. minced onion for each person
1 to 2 sliced hotdogs for each person
salt and pepper

In a large skillet (non-stick or cast iron, I use non-stick for easy clean up) heat oil over medium high heat. 

When oil is hot, add potatoes and then onions on top of the potatoes. Arrange them in a single layer (or as close as possible) and them leave them alone for about five minutes. Toss the hotdogs on top and then stir, attempting to get the potato pieces flipped over. Cook for about 30 minutes, until potato pieces are tender and everything is lovely and browned.


Wednesday, May 16, 2012

Oh-so-good-and-yummy Granola Bars


Granola bars have become a recent favorite snack food in our house. I used to not buy them because most of them contain nuts, or are manufactured in a facility with tree nuts or peanuts.

My son Noah who has the tree nut/peanut allergies was actually afraid to even try the ones we deemed safe because for so long we had avoided them. But recently he tried one and decided they are a wonderful treat. Because he's 15 years old, 6 feet two inches and around 200 pounds, he can just about eat my weight in granola bars.

I found this recipe recently (actually I think my daughter's little friend gave it to her) and modified it a bit to suit our taste (and budget!). The original recipe came from Rachel Ray. They are super easy to make, and though they still have quite a bit of sugar in them, at least I know what everything is. One batch makes a loaf pan -- then I just cut straight across for six or seven bars. A double batch makes a 9x9 pan which I cut in half one way and then each half in six or seven bars. You can add mini chips to the top (pressing them into the granola bars) or add some nuts, seeds, toasted coconut, raisins -- whatever -- to the mixture. Just don't add so much that they don't stick together anymore. And if you use nuts chop them up.

I tried reducing the sugar content and they didn't turn out as well (they didn't stick together well), but let me know if you have success with that.


the ones with the peanuts did not stick together well at all. Chop your nuts!


Granola Bars

1 cup Rice Krispies
2 cups quick oats (not old-fashioned)
1/4 cup butter
1/4 cup honey
1/3 cup brown sugar
1/2 t. vanilla

Grease a loaf pan (9x5). 
In a large bowl mix oats and Rice Krispies.
In a small saucepan place butter, honey and brown sugar. Heat to a boil over medium high heat. Boil for two minutes, stirring occasionally. Remove from heat. Add vanilla. 

Pour over oats and Krispies and stir to combine. Pour into loaf pan and press down firmly to compact the mixture really well. I tried buttering my hands, but the best tool was a wide spreading sort of spatula.


Let cool completely -- at least an hour. Refrigerate if necessary. Turn out onto cutting board (or cut in pan). Wrap in waxed paper and store in a glass jar or other airtight container. They will keep for a week or more (if they last!).


Wednesday, April 18, 2012

Rumbi Rice


We had a very fast spring break last week -- it seemed like I blinked and it was over, and now we are having re-entry. It's so much harder to get into life after a break -- it makes me wonder if it's worth it...but the free time is so wonderful.

I have a backlog of recipes to share with you here. This one was a big hit, which is rather odd since it is veggie-packed. I saw the recipe at a new-to-me favorite website "Favorite Family Recipes." It's called Rumbi Rice and is apparently a popular dish at a popular restaurant in Utah. I've never been to Utah, and thus not the restaurant, but it just looked like a yummy dish with a funny name. 

I made it exactly as directed, using my rice cooker for the rice (good rice), except when it came to the Hawaiian sauce (Mr. Yoshida's). This sauce is an unknown in my neck of the woods, so I used Kikkoman which was super duper salty. I used the Hawaiian sauce sparingly, but the kids and my husband did not, and they had a hard time finishing their meals. I would highly recommend making a homemade teriyaki if you are not able to get a low-salt version, or using the sauce very sparingly. Oh...and I left out the celery (reluctantly) because of my celery haters.

And, by the way, I think it would be just as good without the chicken. My family disagrees.

This served my five with leftovers.

Rumbi Rice

1 T. vegetable oil
4 carrots, peeled and grated
3 celery stalks, washed and sliced
1 zucchini, chopped into small cubes
1 1/2 c. chopped broccoli florets
2 c. chicken, grilled and cut into small cubes

*Rumbi Rice (see recipe below)

**Spicy Hawaiian Teriyaki Sauce (see recipe below)

Heat vegetable oil in a large skillet over medium-high heat. Add carrots, celery, zucchini, and broccoli (pretty much equal parts of said vegetables.. you can add more or less veggies depending on your taste). Saute ONLY until vegetables are crisp tender. About 1-2 minutes tops.

Serve over Rumbi rice and top with chicken. Serve with Spicy Hawaiian Teriyaki Sauce on the side (about 3 Tbsp. per bowl.. you can add more or less depending on your taste).


*Hawaiian Coconut Rice with Red Beans (aka Rumbi Rice)
2 c. long grain white rice
2 1/2 c. water
1 (14oz) can coconut milk (about 1 1/2 c.)
1/2 Tbsp. sugar
1 can red beans, drained and rinsed

Combine all ingredients in a rice cooker. Gently stir it all together so the beans are all mixed. Place the lid on and start the rice cooker. Fluff rice with a fork before serving.
If you don’t have a rice cookerCombine water, coconut milk, and sugar in a saucepan. Stir in rice and beans. Bring to a boil over medium heat. Cover, reduce heat, and simmer 18 to 20 minutes, until rice is tender. 


**Spicy Hawaiian Teriyaki Sauce:
3/4 c. Mr. Yoshida’s teriyaki sauce
1 t. soy sauce
2 tsp. chili garlic sauce (Sriracha)
1 tsp. fresh ginger
pinch of salt
pinch of brown sugar
1 T. cornstarch
2 T. cold water
Combine Yoshida’s, soy sauce, garlic sauce, ginger, salt, and brown sugar in a small saucepan. Bring to a boil and then reduce to a simmer. Combine cornstarch and water and SLOWLY add to sauce for thickening. You want it to be slightly thicker than the Yoshida’s sauce. Allow to simmer for about a minute. Cool to room temperature and serve with your rice bowls.


Printer version


Friday, March 23, 2012

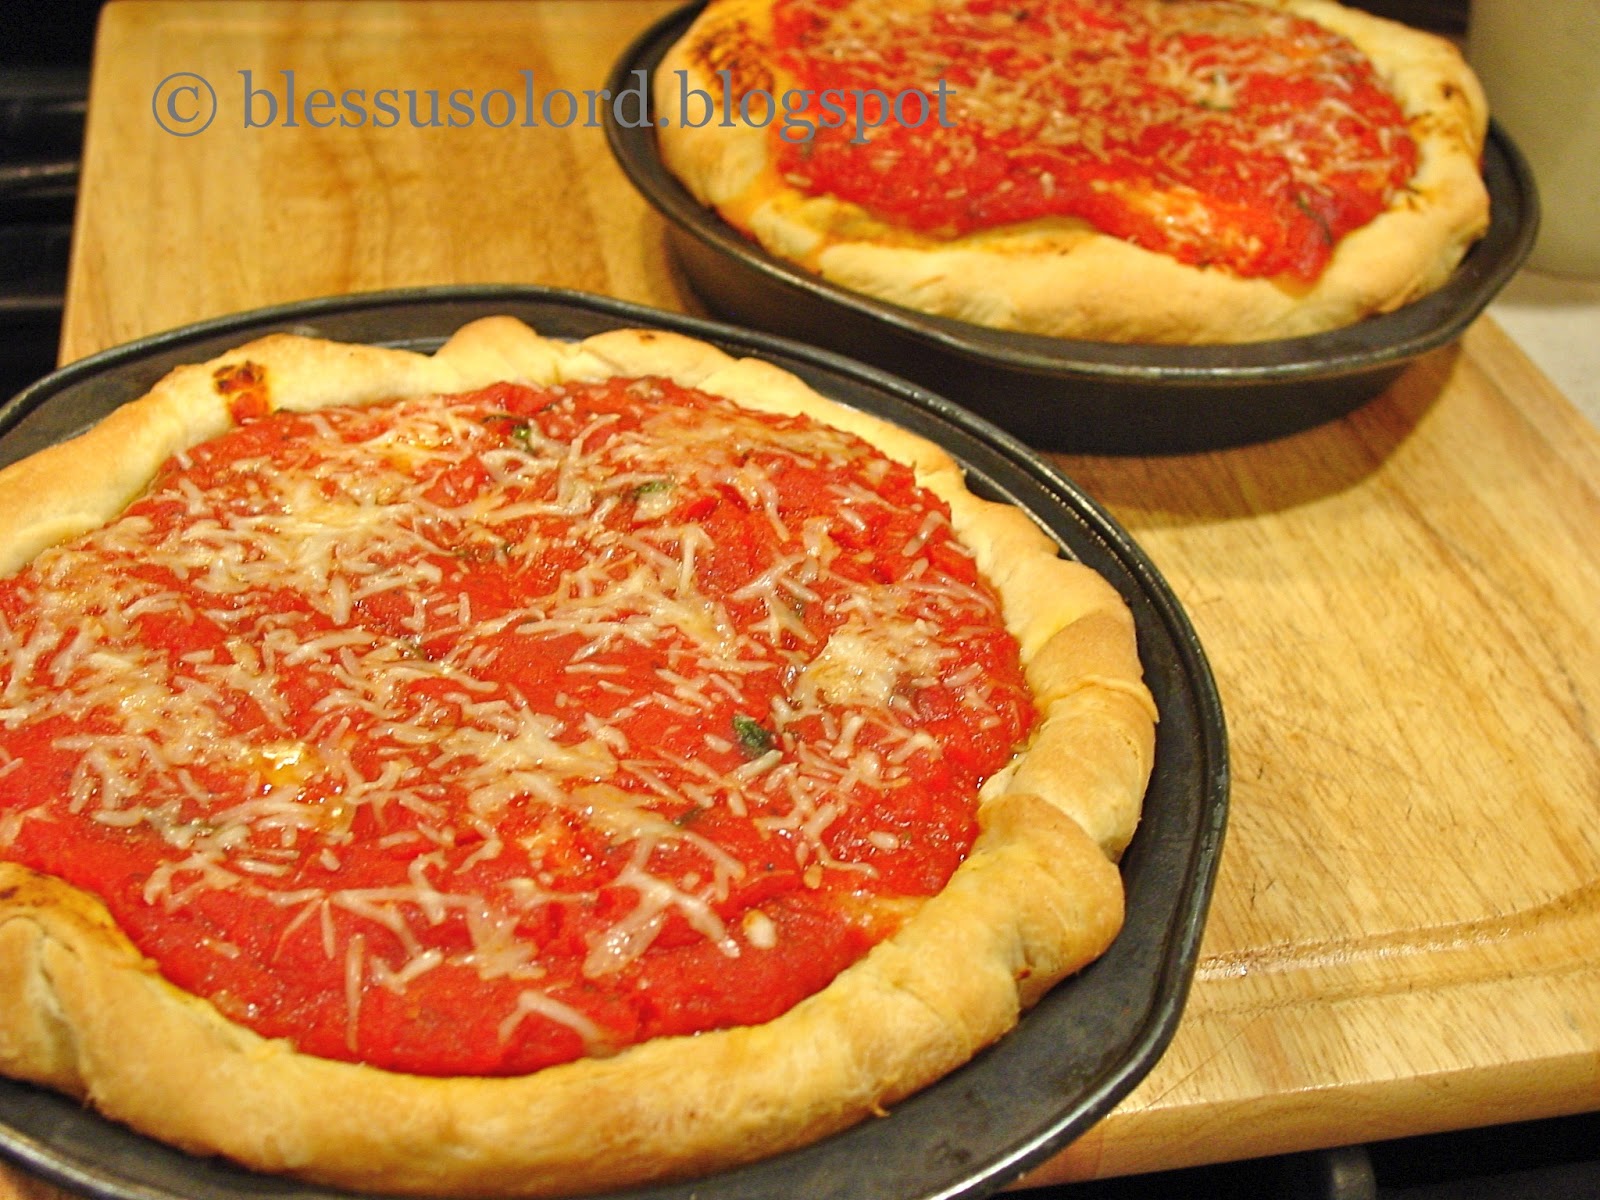
Chicago Style Pizza

One of my lovely readers noticed my absence lately (hi Linda!). I was wondering if anyone was still reading and I am glad to know that one reader is still hanging on.

I tease...and yet. Really. It's kinda lonely in here.


A couple weeks ago my mom and I made a trip with my daughter to Chicago, to the American Girl store. Yes, we drove six and a half hours one way just to take her to the American Girl Sore. For her birthday. Once in a lifetime kinda thing.

I was really disappointed that we never got any Chicago-style pizza while we were there. I was actually really disappointed that we had one good meal the whole time we were there, and that was breakfast, but that's another story. As luck would have it the Monday after we got home the Brown-eyed Baker featured Chicago style pizza. It took about .00001 seconds for me to decide that I needed to make Chicago style pizza for dinner.

Thanks to the Brown-eyed Baker I never have to go to Chicago again (because now the AG store is off the bucket list). This recipe was very easy to follow and it was delicious pizza! My boys love, loved it, and I think it will be making an appearance here often. The dough might look complicated, but it's not. It's easy as...pie.

I think my one mistake was to use shredded Parmesan instead of grated. I think we needed grated, although no one complained.  Next time I will use grated. Also modified -- I used a couple tablespoons of sugar instead of the 1/4 teaspoon Michelle used. We like sweet sauce.


Chicago Style Pizza
makes 2 pizzas

For the Dough:
3¼ c. all-purpose flour
½ c. yellow cornmeal
1½ t. salt
2 t. sugar
2¼ t. instant yeast
1¼ c. water, room temperature
3 T. unsalted butter, melted
4 T. unsalted butter, softened
1 t. + 4 T. olive oil, divided


For the Sauce:
2 T. unsalted butter
¼ c. grated onion
¼ t. dried oregano
½ t. salt
2 garlic cloves, minced
1 (28-ounce) can crushed tomatoes
¼ t. sugar ( I used at least 2 T.)
2 T. coarsely chopped fresh basil
1 T. olive oil
Freshly ground black pepper


For the Toppings:
1 pound mozzarella cheese, shredded (about 4 cups)
(Pepperoni)
¼ c. grated Parmesan cheese


 Make the Dough: Whisk together the flour, cornmeal, salt, sugar, and yeast in a large bowl. Add water and melted butter and mix on low speed, using a dough hook, until fully combined, 1 to 2 minutes, scraping sides and bottom of bowl occasionally. Increase speed to medium and knead until dough is glossy and smooth and pulls away from sides of bowl, 4 to 5 minutes. (You can easily make this by hand, mixing in the water and butter with a spatula and then kneading by hand.)

Coat a large bowl with 1 teaspoon olive oil. Using greased spatula, transfer dough to bowl, turning to coat the dough in oil; cover tightly with plastic wrap. Let rise at room temperature until nearly doubled in volume, 45 to 60 minutes.


 Make the Sauce: While dough rises, heat the butter in a medium saucepan over medium heat until melted. Add onion, oregano, and salt; cook, stirring occasionally, until liquid has evaporated and onion is golden brown, about 5 minutes. Add garlic and cook until fragrant, about 30 seconds. Stir in tomatoes and sugar, increase heat to high, and bring to a simmer. Lower heat to medium-low and simmer until reduced to about 2½ cups, 25 to 30 minutes. Off the heat, stir in the basil and olive oil, then season with salt and pepper.


 Laminate the Dough: Turn the dough out onto dry work surface and roll into a 15×12-inch rectangle. Using an offset spatula, spread the softened butter over the surface of the dough, leaving a ½-inch border along the edges. Starting at the short end, roll the dough into a tight cylinder. With seam side down, flatten the cylinder into an 18×4-inch rectangle. Cut rectangle in half crosswise. Working with one half, fold into thirds like a business letter; pinch seams together to form ball. Repeat with remaining half. Return balls to oiled bowl, cover tightly with plastic wrap, and let rise in refrigerator until nearly doubled in volume, 40 to 50 minutes. Meanwhile, adjust oven rack to lower position and preheat oven to 425 degrees F.

 Bake the Pizzas: Coat two 9-inch round cake pans with 2 tablespoons olive oil each. Transfer 1 dough ball to dry work surface and roll out into a 13-inch circle. Transfer dough to the pan by rolling the dough loosely around a rolling pin and unrolling into pan. Lightly press dough into pan, working into corners and 1 inch up sides. If dough resists stretching, let it relax for 5 minutes before trying again. Repeat with remaining dough ball.


 For each pizza, sprinkle 2 cups mozzarella evenly over surface of dough. (If you’re using any meat or veggie toppings, add them now, on top of the cheese.) Spread 1¼ cups tomato sauce over the cheese (or toppings) and sprinkle 2 tablespoons Parmesan over sauce. 


Bake until crust is golden brown, 20 to 30 minutes. Remove pizza from oven and let rest 10 minutes before slicing and serving.

Source: Brown-eyed Baker

Friday, March 9, 2012

Goulash


Pin It


I have a memory from my childhood of a food my mother called goulash. We are part Hungarian and so I always thought it was authentic goulash, except every goulash I have ever eaten since really tastes nothing like it. My mother has no recollection of this goulash so I can't compare recipes. It looked like authentic goulash (to my memory) but was much sweeter, almost like a barbecued beef. I tried this recipe for Beef Goulash from Tastes Like Home Cooking and it was not exactly the goulash from my memory, but it was really good. My husband loved it and even the kids ate it (except one picked out the onions, ugh). I will definitely make this recipe again -- it's easy and budget-friendly. It's been a couple weeks so my memory is fuzzy, but I'm pretty sure I added about a tablespoon of sugar to it, so I am listing that in the ingredients. Can't hurt, right?


Beef Goulash
serves 5-6

1 1/4 pounds chuck roast, excess fat trimmed, cut into large cubes
2 T. vegetable oil
1 medium onion, sliced
2 cloves garlic, chopped
1 1/2 T. paprika (use the good stuff or another good Hungarian paprika)
15-oz can diced tomatoes
1 T. tomato paste
2 t. flour
2 cups beef broth, divided
1 T. dried thyme
1 T. sugar
salt and pepper to taste
egg noodles, cooked according to package directions
sour cream for topping

Preheat oven to 325 degrees. Heat oil in a oven safe casserole dish and add beef, cooking until brown. Add onions and garlic, and cook until onions are transparent. Add paprika and stir.

Add tomatoes and tomato paste. Dissolve flour in 1 cup beef broth and add to pot. Add thyme and sugar, then salt and pepper to taste. Bring to a boil, stirring often.

Cover tightly and place in oven. Cook for 1 hour. After an hour, if the mixture looks dry, add another 1 cup beef broth. Cover and cook an additional hour. Serve with egg noodles and a dollop of sour cream.
 

source: modified slightly from Taste of Home Cooking


Tuesday, March 6, 2012

Buttermilk Waffles


Pin It


Since we were married (26 years ago), I have owned two waffle makers, both Belgian style. Unless they are for dessert, I dislike Belgian waffles -- too high of a middle to edge ratio. I like a nice crisp waffle and when my Belgian waffle died a few months ago I looked for a waffle iron that produced a flat waffle, but could not find one I was willing to splurge on. A couple weeks ago I finally found one -- this variety (which I got for quite a bit less at Amazon). We have enjoyed waffles most every Sunday morning since it arrived, and my children are delighted.

I use the Buttermilk Waffle recipe found in my King Arthur Flour cookbook and it is really just perfect, crispy on the outside, soft in the middle, slightly tangy and buttery. Yum. Many waffle recipes have you beat the whites separate from the yolks, but this one does not, which makes it nice and easy for breakfast. You can have it whipped up and have steamy waffles baking in your iron in no time.


Buttermilk Waffles

2 large eggs
1 3/4 c. buttermilk
1/2 c. (1 stick) butter, melted and cooled to room temperature
2 t. vanilla
2 c. unbleached pastry flour OR 1 3/4 c. unbleached all-purpose flour (I use all-purpose)
2 T. sugar
2 t. baking powder
1 t. soda
1 t. salt
1/2 c. pecan meal (optional -- I do not use for allergy reasons)


In a medium-sized mixing bowl, beat together the eggs, buttermilk, melted butter or margarine and vanilla. In another bowl whisk together the dry ingredients. Combine the wet and dry ingredients just until almost smooth.

Spray your waffle iron with a non-stick cooking spray before preheating it. For an 8-inch round waffle iron, use about 1/3 cup batter. Cook for 2 to 3 minutes, until the iron stops steaming. Yield: about ten 8-inch waffles.

Source: King Arthur flour cookbook

Tuesday, February 21, 2012

ihop Pancakes


Because pancakes are a traditional Shrove Tuesday dish, I thought I'd get this recipe up for you.I saw it at Starry Sky Ranch, and though I have a favorite Buttermilk Pancake recipe, I couldn't resist the ihop recipe. They are really yummy, and actually very similar to Alton's recipe (my other favorite). Maybe you'll make some for lunch today -- delicious and comforting and very Shrove-like. And if you need a little sumpin sumpin later, be sure to whip up some Fastnachts. Yum.

iHop Pancakes

1 1/4 c. flour
1 1/2 t. baking powder
2 1/2 t. sugar
1/2 t. salt
1/2 t. baking soda
2 T. vegetable oil
1 egg ( slightly beaten )
1 1/2 c. buttermilk 

Mix (do no overmix!) and bake on a hot griddle.

Source: copykat via Starry Sky Ranch

Friday, January 13, 2012

Budget soup


I don't like to use the word "budget" because I think it has negative connotations, but I am also one who calls a spade a spade. This is budget soup. The ingredients are inexpensive to buy, and when feeding a large family that's something.

Though it is far from haute cuisine, it is most edible, and, in fact, quite tasty, and I would definitely make it over and over. I found the recipe after a friend told me she had purchased a jar of soup ingredients at a holiday craft sale. She mentioned the name of the woman who put the soups together, and I remembered that I had seen this same person's recipe in a school cookbook. The recipe was originally created to assemble a jar of it and give it someone else. The only thing the jar needs in addition to the ingredients in the jar, is a pound of ground meat and a can of tomatoes. I never assembled it in a jar, just measured the ingredients as listed and dumped them in a pot.


The leftovers were great for lunch on the go.


The recipe gives the option of using chili powder for seasoning or Italian seasoning. I used my own combination of Italian herbs, shown below. I did not have barley or split peas when I made it so I subbed more lentils for the peas and more rice for the barley. I also used all star shaped pasta instead of the recommended ABC pasta and additional shaped pasta. I wouldn't mind using the other ingredients, but it's all grain and I think you would be fine with almost any combination.

I ate the leftovers for lunch several days later (as well as took two jars to my neighbors) and it was a little more like stew left over -- the grains swelled and absorbed the broth. You could add more broth or another can of tomatoes, but it was really very good like that.


Budget Soup
(aka Love Soup -- I guess for when you are giving it away)

1/3 cup beef boullion or soup base (see note)
1 T. chili powder OR 1 1/2 T. Italian seasoning (see note)
1/4 cup onion flakes (see note)
1/2 cup split peas
1/2 cup ABC macaroni
1/4 cup barley
1/2 cup lentils
1/2 cup rice
pasta (any shape)

1 pound ground meat (I used ground chuck)
1 can chopped tomatoes (see note
salt and pepper

To give away in a jar: Layer ingredients, in order listed, in a 1-quart jar. Use shaped pasta to fill the top. Close jar with a ring and cap. Add preparation instructions on a tag.

To prepare: brown 1 lb ground meat ; drain.
Reserve shaped pasta to add later. Add remaining ingredients to beef and add 12 cups water. Add can of tomatoes with juice. Simmer for 45 minutes. Taste and season. Add reserved pasta and cook until pasta is tender, 10 to 15 minutes, Serve.

Notes: 
If you prefer not to use soup base, you can use beef broth, but that will raise the cost. You'll also have to adjust seasoning. 

For Italian seasoning, use equal amounts of dried basil, oregano, thyme, rosemary and marjoram to equal 1 1/2 tablespoons.

I used 3 T. onion powder instead of onion flakes.
The recipe called for 28 oz. of tomatoes, however to reduce acid I used a 14 oz can with fine results. Use whatever suits your taste.

Meat can be left out for vegetarian soup.


Source: St. Paul School cookbook

Friday, January 6, 2012

Jamie's Chicken Chow Mein


I have a recipe for Chicken Chow Mein in my cookbook, and it's a good recipe, but after trying Jamie Oliver's version for dinner the week, I'm afraid I'll never make my old recipe again. This recipe was the epitome of what I am looking for in meals this year. It was easy. It was delicious. But best, it was made with simple and whole ingredients, getting most of the flavor from fresh vegetables, herbs, and citrus, with no jarred sauces (except soy). The flavors, unlike most in Chinese/American were bright and fresh and definitely a little spicy. I used the recipe as written on Jamie's website and modified just a little (subbed red pepper flakes for a whole red Chili unavailable at my grocer). I also doubled it for four of us with just a little bit leftover. You could get two adult and three or four child servings from the recipe below. I think in the future I will sub some fresh veggie (like snap peas) for the water chestnuts, but mostly because my kids are not big fans of water chestnuts. I did not use the mushrooms because we have mushroom haters.

Just so you know you can cook Chinese without special equipment, I cooked mine in a large nonstick skillet.

Jamie's Chicken Chow Mein
 serves 4-5


a thumb-sized piece of fresh root ginger
4 cloves of garlic
1/2 to 1 t. red pepper flakes
2  large skinless chicken breast fillet (I used four med/small and we had a lot of chicken)
  salt and freshly ground black pepper
5 scallions
  a small bunch of fresh cilantro
1 to 2 heads bok choy, depending on how much you like it
Optional: 4 shiitake mushrooms
10 oz. chow mein noodles
  peanut or vegetable oil
1 T. cornstarch
8-ounce can of water chestnuts (or 1 cup of another quick-cooking veggie, like snow or snap peas)
4-5 tablespoons soy sauce
 1 small lime

To prepare your stir-fry
Put a large pan of water on to boil. Peel and finely slice the ginger and garlic. Place your red pepper flakes with the ginger and garlic. Slice the chicken into finger-sized strips and lightly season with salt and pepper. Cut the ends of your scallions and finely slice. Halve the bok choy lengthwise and cut crosswise into large strips. If using the mushrooms, either tear into pieces or leave whole.

To cook your stir-fry
Preheat a wok or a large frying pan on a high heat and once it’s very, very hot, add a good lug of peanut oil and swirl it around. Stir in the chicken strips and cook for a couple of minutes, until the chicken browns slightly. Add the ginger, chile, cilantro stalks, mushrooms (if using) and half the scallions. Stir-fry for 30 seconds, keeping everything moving around the wok quickly. Add your noodles and bok choy to the boiling water and cook for 2 to 3 minutes, no longer. Meanwhile add the cornstarch, water chestnuts, and their water to the wok and give it another good shake to make sure nothing sticks to the bottom. Remove from heat and stir in soy sauce (start with half and taste to see if you need more). Halve the lime, squeeze the juice of one half into the pan and mix well. Drain the noodles and bok choy in a colander over a bowl, reserving a little of the cooking water. Stir in the noodles and bok choy, with a little of the cooking water to loosen, if necessary, and mix well. Have a taste and season with more soy sauce if needed.

To serve your stir-fry
Use tongs to divide everything between two bowls or plates, or lift onto one large serving platter. Spoon any juices over the top and sprinkle with the rest of the scallions and the cilantro leaves. Serve with lime wedges.

Yum.


Friday, November 18, 2011

Homemade Pasta


Years and years ago my mother-in-law bought me a pasta roller (like this) for a gift. I enjoyed having such a "gourmet" piece of kitchen equipment, and I used it some, but it was sort of relegated to the kitchen equipment which we use only for special occasions. Ironically, I still made homemade noodles by hand, but the pasta machine was put away in a basement cabinet.

This past Sunday, I planned spaghetti and meatballs for dinner and then I realized I had no dry pasta. I dislike going to the grocery store so much I went down to the basement and dusted off the pasta machine. When I was finished cutting the spaghetti I realized I had invested very little time, actually, and after we ate I realized how much I love homemade pasta. There is just no comparison. Homemade pasta is so tender and tasty and wonderful. I actually have no good words to describe it. You really must try it. If you don't own a pasta machine, maybe you can put it on your Christmas list (there are an awful lot out there in all price ranges).

I use the food processor to make my pasta dough and it's really super easy -- three ingredients: flour, salt and eggs (cheap, too!). From start to finish it takes less than two minutes to make the dough. It takes less then 20 minutes to roll and cut it. It may not be practical every night, but it's not so tough with just a wee bit of time. Your family will love you for it, so consider it a labor of love.


Homemade Pasta
serves six for dinner

2 1/2 cups all-purpose flour
1/2 t salt
4 eggs

Place flour and salt in bowl of food processor. Crack eggs into a measuring cup with a spout. Turn machine on and pour the eggs through the feeding tube. Let run for about 30 seconds until dough gathers in a ball. Pull dough out and put machine back together. Turn it on and, tearing off balls of dough (small enough to feed through the tube, but not too small), feed them into the machine one at a time, but fairly quickly. Let the machine run until dough gathers in a ball again.

Remove ball of dough from machine and wrap in plastic wrap. You can use it right away in a pinch, but it will be better if you let it rest for 30 minutes.

Unwrap dough after rest and cut into 10 or so pieces (see photo).

yes, it is that yellow


Flour each piece lightly and set rolling side of pasta machine on the lowest setting. Roll each piece through once. 


Set the machine on a higher setting, two or three notches above the lowest. It really depends on what kind of pasta you are making at this point. I wanted spaghetti, so I set it two notches above, leaving it a little thick.


Keep each piece floured lightly as you work with them and cut them in half as necessary to keep them from being too long and unmanageable. 

After all pieces are the desired thickness, it's time to cut. I used the most narrow setting for spaghetti. If you wanted fettuccine, you would use the wider setting. For angel hair, I would use the narrow setting and a very thin sheet of dough.


After flouring each sheet, feed them through the machine to cut it. Lay each bunch on a floured surface. Let sit for about 30 minutes. 

Bring several quarts of water to a boil, salt. Add pasta, in thirds, to the water and stir to prevent sticking, until all pasta is in water. Cook for two to three minutes until desired texture. Drain.